Configure Nutanix resources with Ansible
Introduction
Infrastructure as Code (IaC) is an IT infrastructure management approach that emphasizes the use of code to automate the provisioning, deployment, and configuration of infrastructure resources. The goal is to treat infrastructure as software, using the same tools, processes, and methodologies to manage it. This approach offers many benefits, like improved consistency, reliability and scalability of infrastructure, faster delivery of new features and services, and reduced risk of human error. Nutanix resources such as images, virtual servers, categories and groups can be configured using IaC. There are various techniques available for this purpose. This blog will focus on utilizing Ansible. In a previous blog post I described the possibilities in Terraform ; you can find more information here: Deploy Nutanix resources with Terraform. While there is some overlap between Terraform and Ansible, Terraform primarily focuses on deployment, whereas Ansible places a stronger emphasis on configuration.
What is Ansible
Ansible is a powerful IaC tool used to simplify and streamline various tasks related to managing and configuring computer systems and networks. It is an open-source platform that allows users to define, automate, and orchestrate a wide range of processes, from software installation and configuration management to system provisioning and application deployment. Ansible works by using simple, human-readable playbooks. One of its notable features is the ability to configure and manage multiple systems simultaneously, making it highly efficient for tasks that involve large-scale infrastructure management. This capability enhances efficiency, consistency, and reliability across IT environments, reducing the manual effort required for repetitive tasks.
If you want to install Ansible, you can find the instructions for various Linux distributions at the following link: install Ansible.
The basics of Ansible
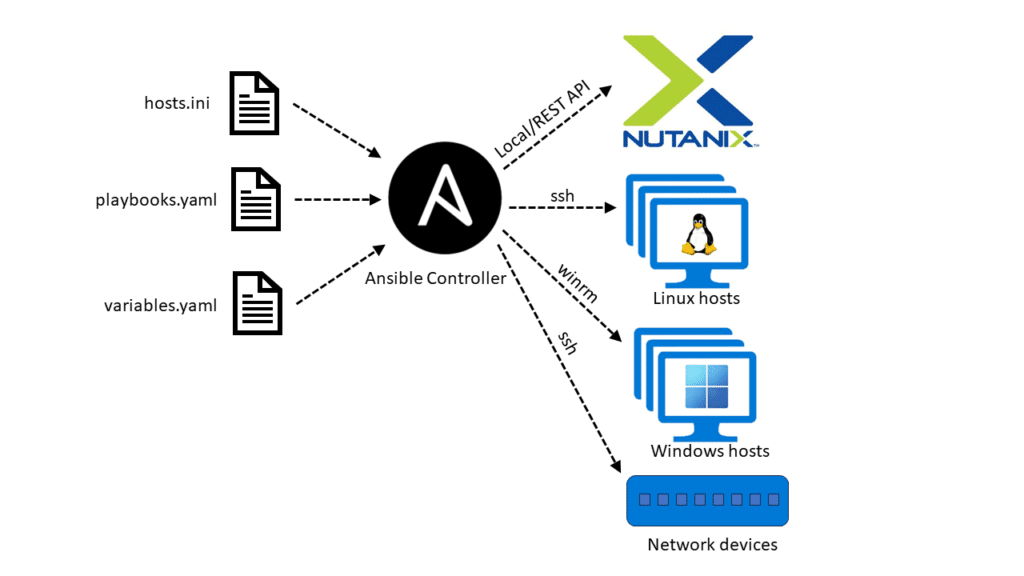
An Ansible configuration is written in a YAML file, known as a playbook. A playbook is a list of tasks to execute on endpoints (Linux hosts, Windows hosts, network devices, etc.) or on the Ansible controller. All endpoints are specified in a file hosts.ini (or another filename). The tasks within a playbook are executed on all hosts or a subset of the hosts specified in the hosts.ini file. For Nutanix-related tasks, most actions are carried out on the Ansible controller (localhost) and result in REST API calls to the Nutanix API server
Ansible works with modules. A module, which may be written in Python, PowerShell, or another language capable of returning JSON, is responsible for performing specific tasks. Some modules are integrated into Ansible’s core, while others are contributed by vendors or the community. Nutanix provides the NCP modules (Nutanix Cloud Platform) to execute tasks on Nutanix hosts. These modules use the v3 Nutanix APIs. Additional information can be found at: Galaxy NG. To install these modules on your Ansible controller, you can use the following command:
ansible-galaxy collection install nutanix.ncp
Ansible core provides a wide range of modules for tasks you can execute on Linux hosts, Windows hosts and network devices. This means that you can use the Nutanix modules to execute tasks on a Nutanix cluster and use the Ansible core modules to execute tasks on deployed VMs and network devices. In this way, you can define and deploy in one or more playbooks your entire infrastructure. The power of Infrastructure as Code!
What can you deploy and configure on Nutanix
With Ansible and the Nutanix modules, you can deploy and configure the following resources on Nutanix:
- Prism Central: virtual machines, images, projects, VPCs, categories, users, roles, etc.
- Foundation: create clusters, image nodes, ipmi configuration
- Foundation Central: create clusters, create API keys
- Nutanix Kubernetes Engine (NKE, formerly Karbon): create/delete k8s cluster, private registry
- Nutanix Database Service (NDB): databases, restores, profiles, tags, etc.
See the following link for an overview of all tasks: Overview of all Nutanix tasks.
Deploy and configure Nutanix resources
This section describes some examples of deploying/configuring Nutanix resources. You can find all examples on the Metis IT public git repository: Metis IT Public Repository
The basics
Everything begins with a playbook that specifies on which hosts the playbook must run (in the Nutanix use case, this is always the localhost). It also defines the collections to be utilized and the default values to apply. I have created a template that you can use for all your Nutanix playbooks. You can access this template on the Metis IT public git repository: Ansible template. This template will serve as the starting point for all examples.
This is the content of the template.
- name: template
  hosts: localhost
  gather_facts: false
  vars_files:
   ../variables.yaml
  collections:
    - nutanix.ncp

  module_defaults:
    group/nutanix.ncp.ntnx:
      nutanix_host: "{{ nutanix_host }}"
      nutanix_username: "{{ nutanix_username }}"
      nutanix_password: "{{ nutanix_password  }}"
      validate_certs: false

  tasks:
# just a simple example to get clusterinfo of deployed clusters

    - name: get clusterinfo
      ntnx_clusters_info:
      register: clusters

    - name: print cluster info
      debug:
        var: clusters
The code snippet imports the Nutanix modules, defines the default login credentials and shows clusterinfo of the deployed clusters. The content of the file variables.yaml is:
nutanix_host: <hostname prism central>
nutanix_username: <username to use in prism central>
nutanix_password: <password of the user>
You can use this snippet to create other Ansible playbooks. In the following sections, I’ll describe some use cases. All files can be downloaded from the Metis IT public Git repository. In my experience, the best way to learn Ansible is by doing.
Create an image
The following code snippet (I’ll only show the task) creates an image on Nutanix from a qcow2 image located on a web server. You can find all the necessary files at: Create an image.
    - name: create image from with source as remote server file location
      ntnx_images:
        state: present
        source_uri: "https://geo.mirror.pkgbuild.com/images/latest/Arch-Linux-x86_64-basic.qcow2"
        clusters: "{{ clusters }}"
        name: "Arch Linux"
        desc: "Deployed with Ansible"
        image_type: "DISK_IMAGE"
        wait: true
      register: output
Create a virtual server
Also the deployment of a virtual server can be done with Ansible. This is the code snippet to deploy a virtual server. In this example I’m also using a loop. By using a loop you can deploy more of the same resources from the same task. You can access the playbook from the Metis IT public Git repository Deploy a VM
    - name: Deploy VM
      ntnx_vms:
        state: present
        name: "{{ item }}"
        desc: "{{ description }}"
        timezone: "UTC"
        cluster:
          name: "{{ clustername }}"
        disks:
          - type: "DISK"
            size_gb: 40
            clone_image:
              name:  "{{ image }}"
            bus: "SCSI"
        wait: true
        cores_per_vcpu: 1
        vcpus: 2
        memory_gb: 1
        networks:
          - subnet:
              cluster:
                name: "{{ clustername }}"
              name: "{{ subnet }}"
      loop:
        - arch01
        - arch02
Create a category
It is easy to create categories and assign values to categories with Ansible. See an example on the Metis IT public Git repository Create categories.
Conclusion
Ansible makes it possible to deploy and configure resources on a Nutanix cluster with infrastructure as code, including the related resources, like virtual machines and network components. In this way, you can describe, deploy and configure your whole infrastructure with Ansible in an easy way.
Deel dit bericht
Configure automated enrollment Remote Desktop SSL certificates
Introduction This blog describes the actions to take to configure auto-enrollment of Remote Desktop Connection computer certificates issued by your local CA server instead of using a self-signed Remote Desktop certificate. We will also investigate
Lees meerMicrosegmentation, A secure and agile wall around your most valuable assets
Microsegmentation, A secure and agile wall around your most valuable assets Introduction In today’s world where every little thing is connected to the web and everything is interconnected, securing computer networks is of very importance
Lees meer
Deploy Nutanix resources with Terraform
Deploy Nutanix resources with Terraform Introduction Infrastructure as Code (IaC) is an IT infrastructure management approach that emphasizes the use of code to automate the provisioning, deployment, and configuration of infrastructure resources. The goal is
Lees meer